| 2.8. How to Make an Executable Program | ||
|---|---|---|
 | Chapter 2. Getting Started with Geant4 - Running a Simple Example |  |
| 2.8. How to Make an Executable Program | ||
|---|---|---|
| | Chapter 2. Getting Started with Geant4 - Running a Simple Example | |
The code for the user examples in Geant4 is placed in the subdirectory
examples of the main Geant4 source package. This
directory is installed to the
share/Geant4-X.Y.Z/examples
(where X.Y.Z is the Geant4 version number)
subdirectory under the installation prefix. In the following sections,
a quick overview will be given on how to build a concrete example,
"ExampleB1", which is part of the Geant4 distribution, using CMake and
the older, and now deprecated, Geant4Make system.
Geant4 installs a file named Geant4Config.cmake
located in:
      +- CMAKE_INSTALL_PREFIX/ (where you installed Geant4)
          +- lib/
             +- Geant4-10.1.0/
                +- Geant4Config.cmake
which is designed for use with the CMake scripting language
find_package
command. The example presented below will cover basic usage of
Geant4Config.cmake, and you may find details
on more advanced usage in
Section 4.1.
Building a Geant4 application using CMake
thus involves writing a CMake script
CMakeLists.txt using
find_package and other CMake commands
to locate Geant4 and describe the build of your application against
it.
Whilst it requires a bit of effort to write the script, CMake
provides a very powerful and flexible tool, especially if you
are working on multiple platforms. It is therefore the method
we recommend for building Geant4 applications.
Moving to the concrete example of the ExampleB1 application, its source code is arranged in the following directory structure:
      +- B1/
         +- CMakeLists.txt
         +- exampleB1.cc
         +- exampleB1.in
         +- exampleB1.out
         +- include/
         |  +- B1DetectorConstruction.hh
         |  +- B1EventAction.hh
         |  +- B1PrimaryGeneratorAction.hh
         |  +- B1RunAction.hh
         |  +- B1SteppingAction.hh
         +- src/
         |  +- B1DetectorConstruction.cc
         |  +- B1EventAction.cc
         |  +- B1PrimaryGeneratorAction.cc
         |  +- B1RunAction.cc
         |  +- B1SteppingAction.cc
         +- init.mac
         +- init_vis.mac
         +- run1.mac
         +- run2.mac
         +- vis.mac
Here, exampleB1.cc contains
main() for the application, with
include/ and src/ containing
the implementation class headers and sources respectively.
The .mac files are scripts containing Geant4
UI commands for use at run time.
This arrangement of source files is not mandatory when
building with CMake, apart from the
location of the CMakeLists.txt file in the
root directory of the application.
The text file CMakeLists.txt is the CMake
script containing commands which describe how to build the
exampleB1 application:
      # (1)
      cmake_minimum_required(VERSION 2.6 FATAL_ERROR)
      project(B1)

      # (2)
      option(WITH_GEANT4_UIVIS "Build example with Geant4 UI and Vis drivers" ON)
      if(WITH_GEANT4_UIVIS)
        find_package(Geant4 REQUIRED ui_all vis_all)
      else()
        find_package(Geant4 REQUIRED)
      endif()

      # (3)
      include(${Geant4_USE_FILE})
      include_directories(${PROJECT_SOURCE_DIR}/include)

      # (4)
      file(GLOB sources ${PROJECT_SOURCE_DIR}/src/*.cc)
      file(GLOB headers ${PROJECT_SOURCE_DIR}/include/*.hh)

      # (5)
      add_executable(exampleB1 exampleB1.cc ${sources} ${headers})
      target_link_libraries(exampleB1 ${Geant4_LIBRARIES})

      # (6)
      set(EXAMPLEB1_SCRIPTS
        exampleB1.in
        exampleB1.out
        init.mac
        init_vis.mac
        run1.mac
        run2.mac
        vis.mac
        )

      foreach(_script ${EXAMPLEB1_SCRIPTS})
        configure_file(
          ${PROJECT_SOURCE_DIR}/${_script}
          ${PROJECT_BINARY_DIR}/${_script}
          COPYONLY
          )
      endforeach()

      # (7)
      install(TARGETS exampleB1 DESTINATION bin)
For clarity, the above listing has stripped out the main comments (CMake comments begin with a "#") you'll find in the actual file to highlight each distinct task:
Basic Configuration
The
cmake_minimum_required
command simply ensures we're using a suitable version of CMake.
The
project
command sets the name of the project and enables and configures
C and C++ compilers.
Find and Configure Geant4
The aforementioned
find_package
command is used to locate and configure Geant4 (we'll see how
to specify the location of the Geant4 installation to be used
later when we run CMake), the
REQUIRED argument being supplied so that
CMake will fail with an error if it cannot find Geant4.
The
option
command specifies a boolean variable which defaults to
ON
,
and which can be set when running CMake via a
-D command line argument, or toggled in the
CMake GUI interfaces. We wrap the calls to
find_package
in a
conditional block
on the option value.
This allows us to configure the use of Geant4 UI and
Visualization drivers by exampleB1 via the
ui_all vis_all
"component" arguments to
find_package
.
These components and their usage is described in detail
in Section 4.1.
Configure the Project to Use Geant4 and B1 Headers
To automatically configure the header path, compiler flags
and compiler definitions needed for linking to Geant4, we
use the
include
command to load a CMake script supplied by Geant4. The CMake
variable named Geant4_USE_FILE is set to the
path to this module when Geant4 is located by
find_package
. We recommend the usage of this file as it will
automatically set the compiler definitions
and flags recommended for use with Geant4.
We use the
include_directories
command to add the B1 header directory to the compiler's header
search path. The CMake variable
PROJECT_SOURCE_DIR
points to the top level directory of the project and is set by
the earlier call to the
project
command.
List the Sources to Build the Application
Use the globbing functionality of the
file
command to prepare lists of the B1 source and header files.
Note however that CMake globbing is only used here
as a convenience. The expansion of the glob only
happens when CMake is run, so if you later add or remove files,
the generated build scripts will not know a change has taken
place.
Kitware strongly recommend listing sources explicitly
as CMake automatically makes the build depend on the
CMakeLists.txt file. This
means that if you explicitly list the sources in
CMakeLists.txt, any changes you make will be
automatically picked when you rebuild. This is
most useful when you are working on a project with sources
under version control and multiple contributors.
Define and Link the Executable
The
add_executable
command defines the build of an application, outputting an
executable named by its first argument, with the sources
following. Note that we add the headers to the list of sources
so that they will appear in IDEs like Xcode.
After adding the executable, we use the
target_link_libraries
command to link it with the Geant4 libraries. The
Geant4_LIBRARIES variable is set by
find_package
when Geant4 is located, and is a list of all the libraries needed
to link against to use Geant4.
Copy any Runtime Scripts to the Build Directory
Because we want to support out of source builds so that we
won't mix CMake generated files with our actual sources, we
copy any scripts used by the B1 application to the build
directory. We use
foreach
to loop over the
list of scripts we constructed, and
configure_file
to perform the actual copy.
Here, the CMake variable
PROJECT_BINARY_DIR
is set by the earlier call to the
project
command and points to the directory where we run CMake to
configure the build.
If Required, Install the Executable
Use the
install
command to create an install target that
will install the
executable to a bin directory under the
CMAKE_INSTALL_PREFIX set for your
application (NB: This is not necessarily the same
as the prefix for your Geant4 install!).
If you don't intend your application to be installable, i.e. you only want to use it locally when built, you can leave this out.
This sequence of commands is the most basic needed to compile and
link an application with Geant4. The
Geant4Config.cmake is highly flexible, and
you can find documentation on more advanced usage in
Section 4.1.
The flexibility of CMake itself also allows you to
easily extend the very basic CMakeLists.txt
presented above to support use cases such as using other third
party packages (via
find_package
) or platform specific
configuration. If any of the above is still unclear, we
recommend you study the Kitware CMake Tutorial for an in depth
introduction to writing CMake scripts. Please also ask any questions
on our HyperNews Forum.
With the CMake script in place, using it to build an application is
a two step process. First CMake is run to generate buildscripts
that describe the build in the language of a specific tool such as
make. By default, these will be Makefiles on Unix
platforms and Visual Studio solutions on Windows,
but you can generate scripts for
other tools like Xcode and Eclipse if you wish.
Second, the buildscripts are run by the chosen build tool to
compile and link the application.
A key concept with CMake is that we generate the buildscripts and run the build in a separate directory, the so-called build directory, from the directory in which the sources reside, the so-called source directory. This is the exact same technique you'll have used when when building Geant4 itself. Whilst this may seem awkward to begin with, it is a very useful technique to employ. It prevents mixing of CMake generated files with those of your application, and allows you to have multiple builds against a single source without having to clean up, reconfigure and rebuild.
We'll illustrate this configure and build process on Linux/Mac using
Makefiles, and on Windows using Visual Studio. The example script
and Geant4's Geant4Config.cmake script are
vanilla CMake, so you should be able to use other Generators
(such as Xcode and Eclipse) without issue.
We'll assume, for illustration only, that you've copied the exampleB1 sources into a directory under your home area so that we have
          +- /home/you/B1/
             +- CMakeLists.txt
             +- exampleB1.cc
             +- include/
             +- src/
             +- ...
Here, our source directory is
/home/you/B1, in other words the directory
holding the CMakeLists.txt file for the B1
project.
Let's also assume that you have already installed Geant4 in your
home area under, for illustration only,
/home/you/geant4-install.
Our first step is to create a build directory in which build the example. We will create this alongside our B1 source directory as follows:
        $ cd $HOME
        $ mkdir B1-build
We now change to this build directory and run CMake to generate the Makefiles needed to build the B1 application. We pass CMake two arguments:
        $ cd $HOME/B1-build
        $ cmake -DGeant4_DIR=/home/you/geant4-install/lib64/Geant4-10.1.0 $HOME/B1
Here, the first argument points CMake to our install of Geant4.
Specifically, it is the directory holding the
Geant4Config.cmake file that Geant4 installs
to help CMake find and use Geant4. You should of course adapt the
value of this variable to the location of your actual Geant4
install.
The second argument is the path to the source directory of the project we want to build. Here it's just the B1 source directory as discussed earlier. You should of course adapt the value of that variable to where you copied the B1 source directory.
CMake will now run to configure the build and generate Makefiles. On Linux, you will see the output
        $ cmake -DGeant4_DIR=/home/you/geant4-install/lib64/Geant4-10.1.0 $HOME/B1
        -- The C compiler identification is GNU
        -- The CXX compiler identification is GNU
        -- Check for working C compiler: /usr/bin/gcc
        -- Check for working C compiler: /usr/bin/gcc -- works
        -- Detecting C compiler ABI info
        -- Detecting C compiler ABI info - done
        -- Check for working CXX compiler: /usr/bin/c++
        -- Check for working CXX compiler: /usr/bin/c++ -- works
        -- Detecting CXX compiler ABI info
        -- Detecting CXX compiler ABI info - done
        -- Configuring done
        -- Generating done
        -- Build files have been written to: /home/you/B1-build
On Mac OS X, you will see slightly different output, but the last three lines should be identical.
If you now list the contents of you build directory, you can see the files generated:
        $ ls
        CMakeCache.txt       exampleB1.in   init_vis.mac  run2.mac
        CMakeFiles           exampleB1.out  Makefile      vis.mac
        cmake_install.cmake  init.mac       run1.mac
Note the Makefile and that all the scripts for
running the exampleB1 application we're about
to build have been
copied across. With the Makefile available, we can now build by
simply running make:
$ make -jN
CMake generated Makefiles support parallel builds, so can set
N suitable for the number of cores on your
machine (e.g. on a dual core processor, you could set N to 2).
When make runs, you should see the output
        $ make
        Scanning dependencies of target exampleB1
        [ 16%] Building CXX object CMakeFiles/exampleB1.dir/exampleB1.cc.o
        [ 33%] Building CXX object CMakeFiles/exampleB1.dir/src/B1PrimaryGeneratorA
        ction.cc.o
        [ 50%] Building CXX object CMakeFiles/exampleB1.dir/src/B1EventAction.cc.o
        [ 66%] Building CXX object CMakeFiles/exampleB1.dir/src/B1RunAction.cc.o
        [ 83%] Building CXX object CMakeFiles/exampleB1.dir/src/B1DetectorConstruct
        ion.cc.o
        [100%] Building CXX object CMakeFiles/exampleB1.dir/src/B1SteppingAction.cc
        .o
        Linking CXX executable exampleB1
        [100%] Built target exampleB1
CMake Unix Makefiles are quite terse, but you can make them more
verbose by adding the VERBOSE argument to make:
$ make VERBOSE=1
If you now list the contents of your build directory you will see the exampleB1 application executable has been created:
        $ ls
        CMakeCache.txt       exampleB1      init.mac      run1.mac
        CMakeFiles           exampleB1.in   init_vis.mac  run2.mac
        cmake_install.cmake  exampleB1.out  Makefile      vis.mac
You can now run the application in place:
        $ ./exampleB1
        Available UI session types: [ GAG, tcsh, csh ]

        *************************************************************
         Geant4 version Name: geant4-10-01-ref-00 [MT]   (5-December-2014)
          << in Multi-threaded mode >>
                              Copyright : Geant4 Collaboration
                              Reference : NIM A 506 (2003), 250-303
                                    WWW : http://cern.ch/geant4
        *************************************************************

        <<< Reference Physics List QBBC
        Visualization Manager instantiating with verbosity "warnings (3)"...
        Visualization Manager initialising...
        Registering graphics systems...
Note that the exact output shown will depend on how both
Geant4 and your application were configured. Further output and
behaviour beyond the Registering graphics systems... line
will depend on what UI and
Visualization drivers your Geant4 install supports.
If you recall
the use of the ui_all vis_all in the
find_package command, this results in all
available UI and Visualization drivers being activated in
your application. If you didn't want any UI or Visualization, you
could rerun CMake as:
$ cmake -DWITH_GEANT4_UIVIS=OFF -DGeant4_DIR=/home/you/geant4-install/lib64/Geant4-10.1.0 $HOME/B1
This would switch the option we set up to
false, and result in find_package not
activating any UI or Visualization for the application. You
can easily adapt this pattern to provide options for your
application such as additional components or features.
Once the build is configured, you can edit code for the
application in its source directory. You
only need to rerun make in the corresponding
build directory to pick up and compile the
changes. However, note that due to the use of CMake globbing
to create the source file list, if you add or remove files,
you need to rerun CMake to pick up the changes! This is
another reason why
Kitware recommend listing the sources explicitly.
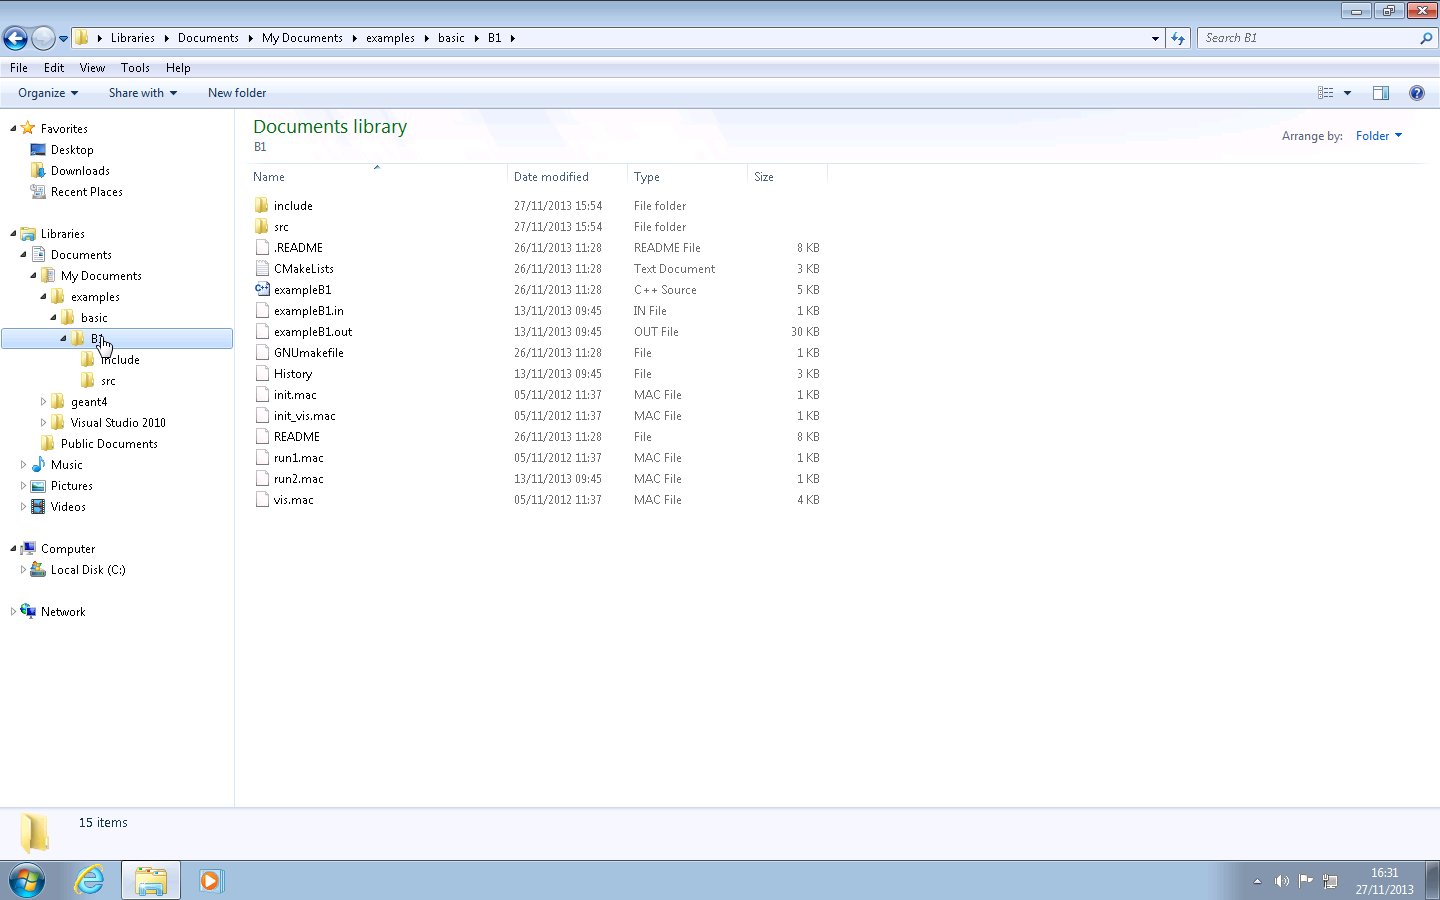
We'll assume, for illustration only, that you've copied the exampleB1 sources into a directory
C:\Users\Ben\Documents\examples\basic\B1
Let's now use the CMake GUI to configure the build and generate a Visual Studio solution for it, and then use Visual Studio to build the application from this solution. This process involves several steps, which we break down as follows.
If you browse the contents of the source directory,
you can see that it contains the CMakeLists.txt
file. So our source directory is
C:\Users\Ben\Documents\examples\basic\B1,
in other words the directory holding the
CMakeLists.txt file.
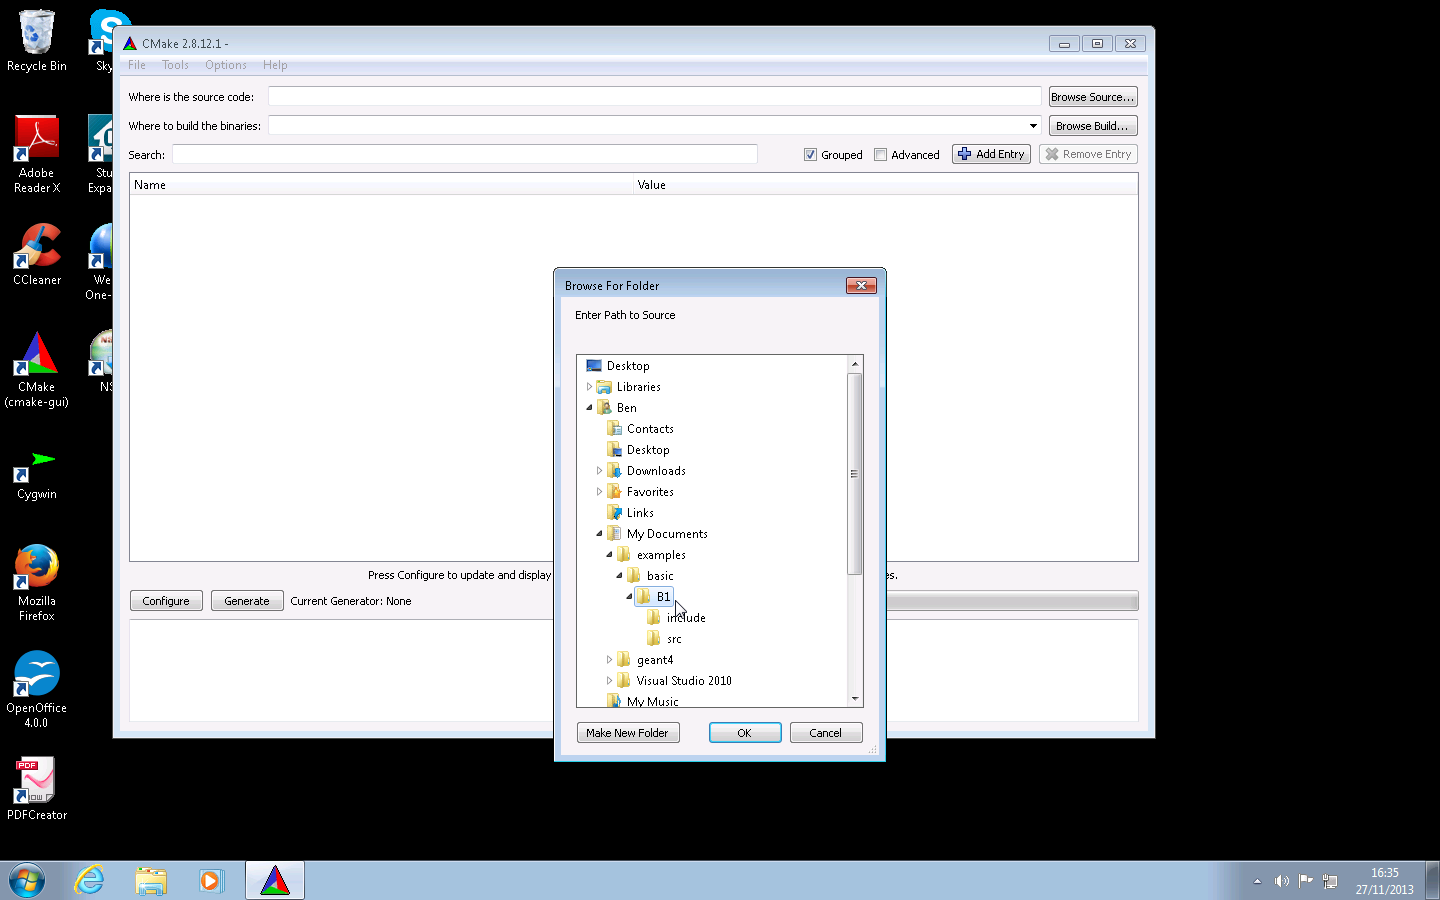
Open the CMake (cmake-gui) executable, and click on the Browse Source... button in the top right hand corner of the window.

Use the file browser popup to locate the B1 source directory, and click OK.
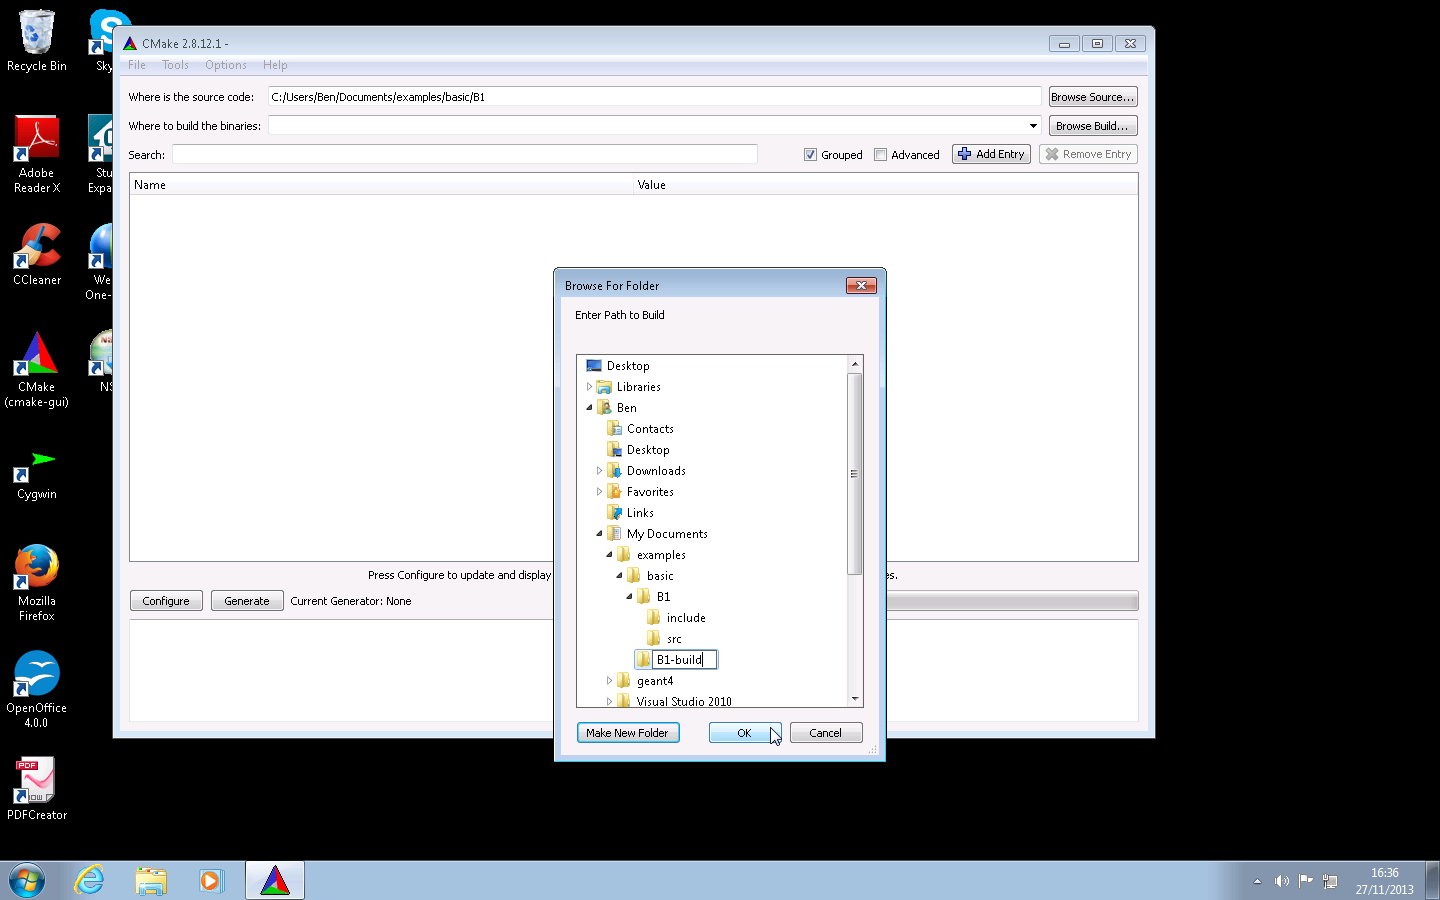
Now we create the build directory in which to create the Visual Studio project files and hold the build products. This directory should not be the same as, or inside, the source directory. Therefore, let's create this build directory alongside our source directory.
Click on the Browse Build... button in
the top right hand side of the CMake GUI window. Use the file
browser popup to browse back
to C:\Users\Ben\Documents\examples\basic,
and click on the
Make New Folder button.
Rename the created folder to B1-build,
and click on the OK button. The two text
entries at the top of the GUI should now contain
C:/Users/Ben/Documents/examples/basic/B1
and
C:/Users/Ben/Documents/examples/basic/B1-build
respectively (Note: CMake always
represents Windows paths with forward slashes).
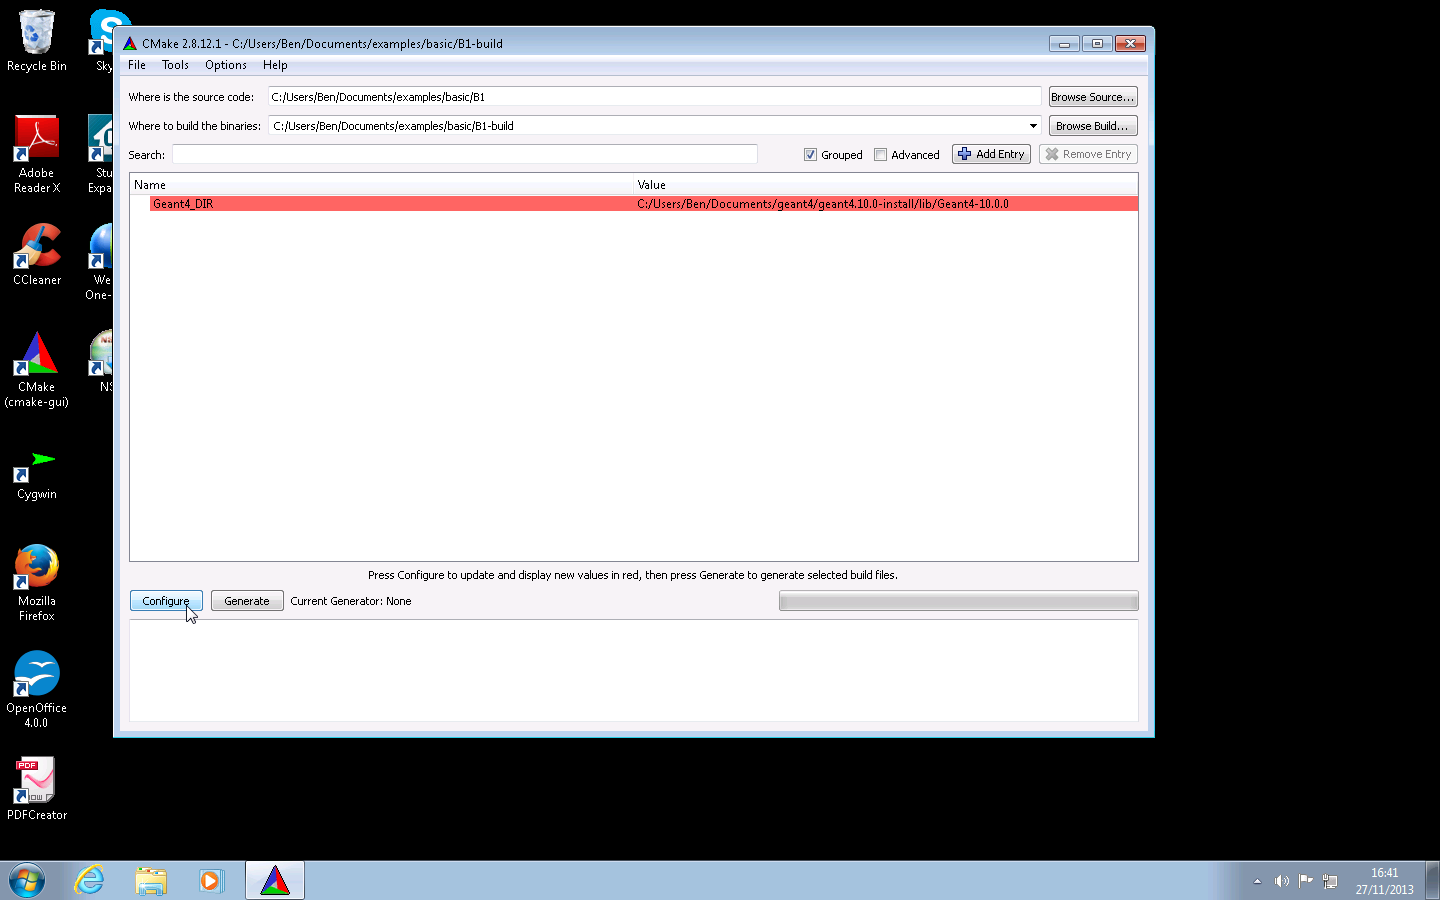
Before we can configure the project, we need to tell CMake where to find Geant4. To do this, click on the Add Entry button in the top right corner of the CMake GUI.

In the Add Cache Entry window that pops up, set the Name of the entry to Geant4_DIR. Set the Type to PATH.

In the Add Cache Entry window, click the
browse button on the right hand side of the
Value to pop up the
Browse For Folder window. Browse to
find your install of Geant4, and select the folder which
contains the Geant4Config.cmake file.
This is generally located in the
lib/Geant4-X.Y.Z (where
X.Y.Z
is the Geant4 version number) folder inside the directory
in which you installed Geant4.

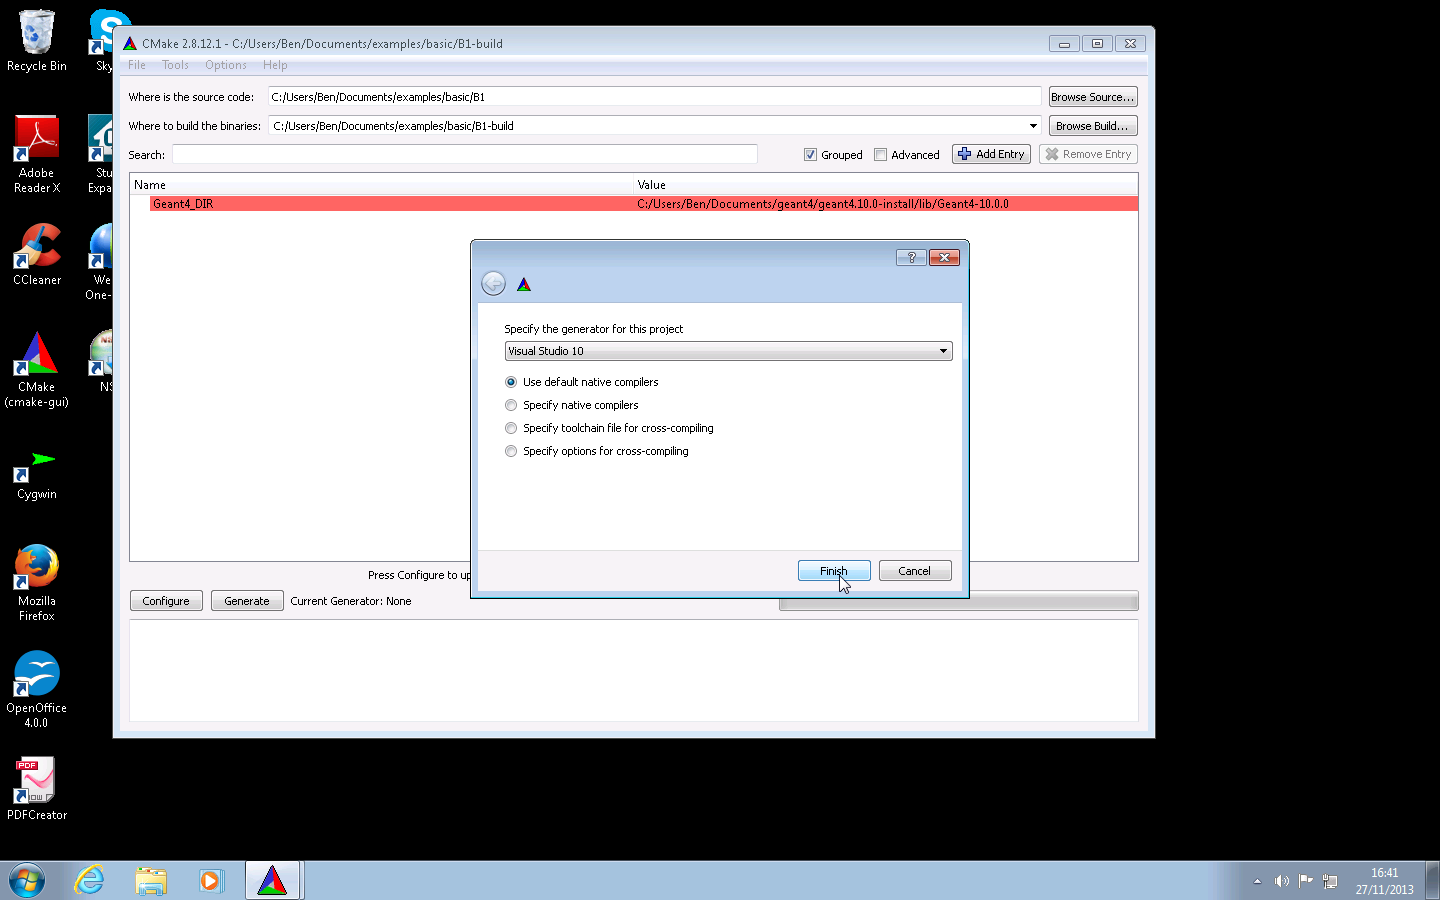
With Geant4_DIR set, click on the Configure button in the bottom left hand corner of the GUI.
In the pop up window, select Visual Studio 12 (or 9 if you have that version installed) and ensure the Use default native compilers radio button is ticked. Click on the Finish button. CMake will run to check that your system can perform the build and that Geant4 can be found. It will output information on its status and any errors in the logging window at the bottom of the GUI.
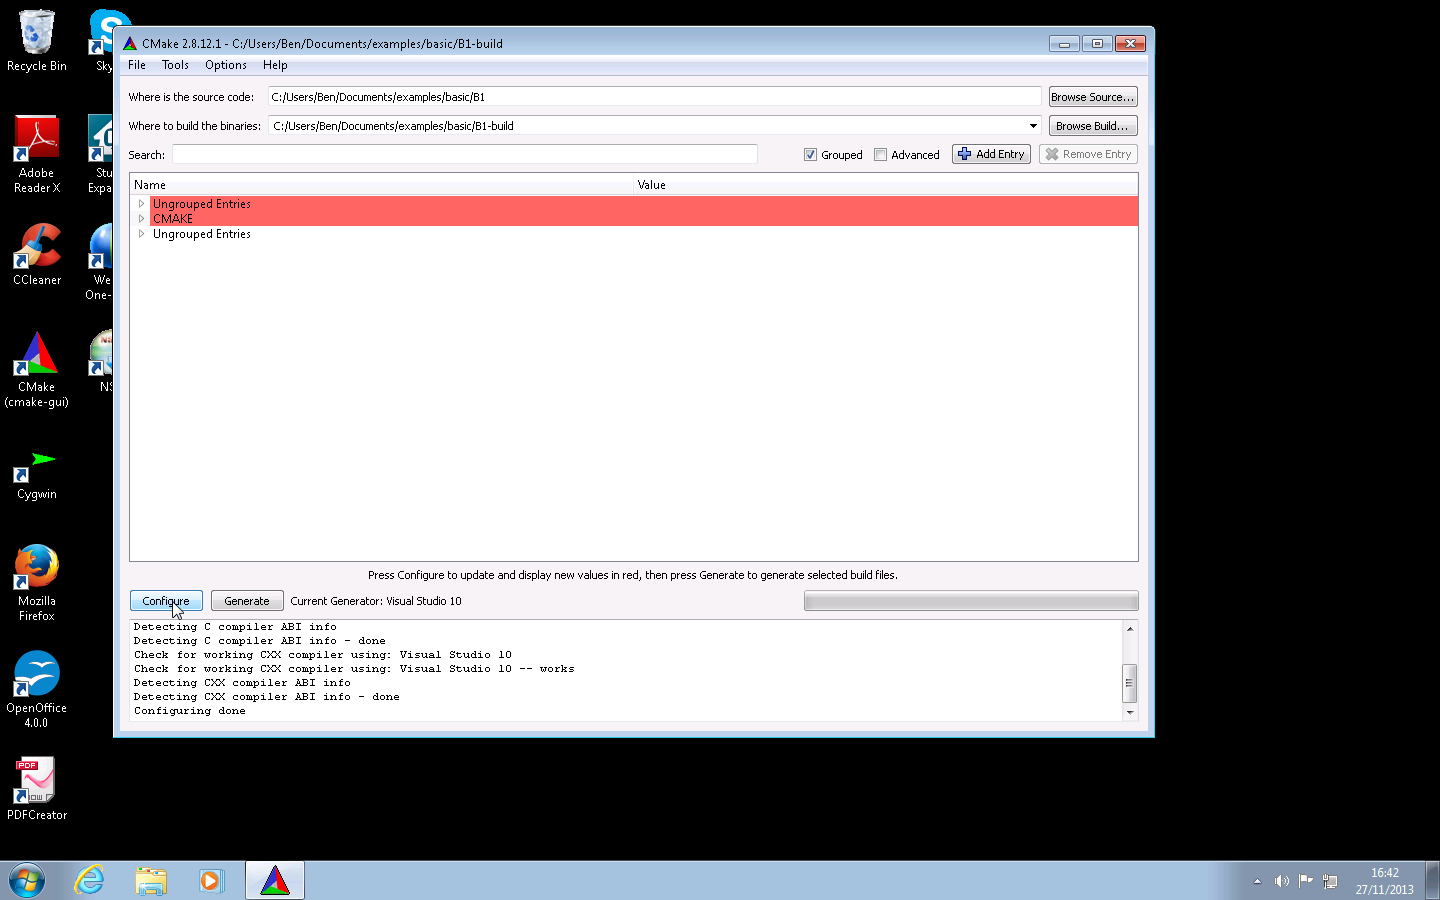
After a successful configuration, you will see Configuring done in the logging window at the bottom, and some red highlighted entries in the main window, including one for CMake. The red color does not always mean there has been an error, but denotes that CMake needs to rerun to resolve options it has found in the build. Simply reclick the Configure button to rerun CMake.
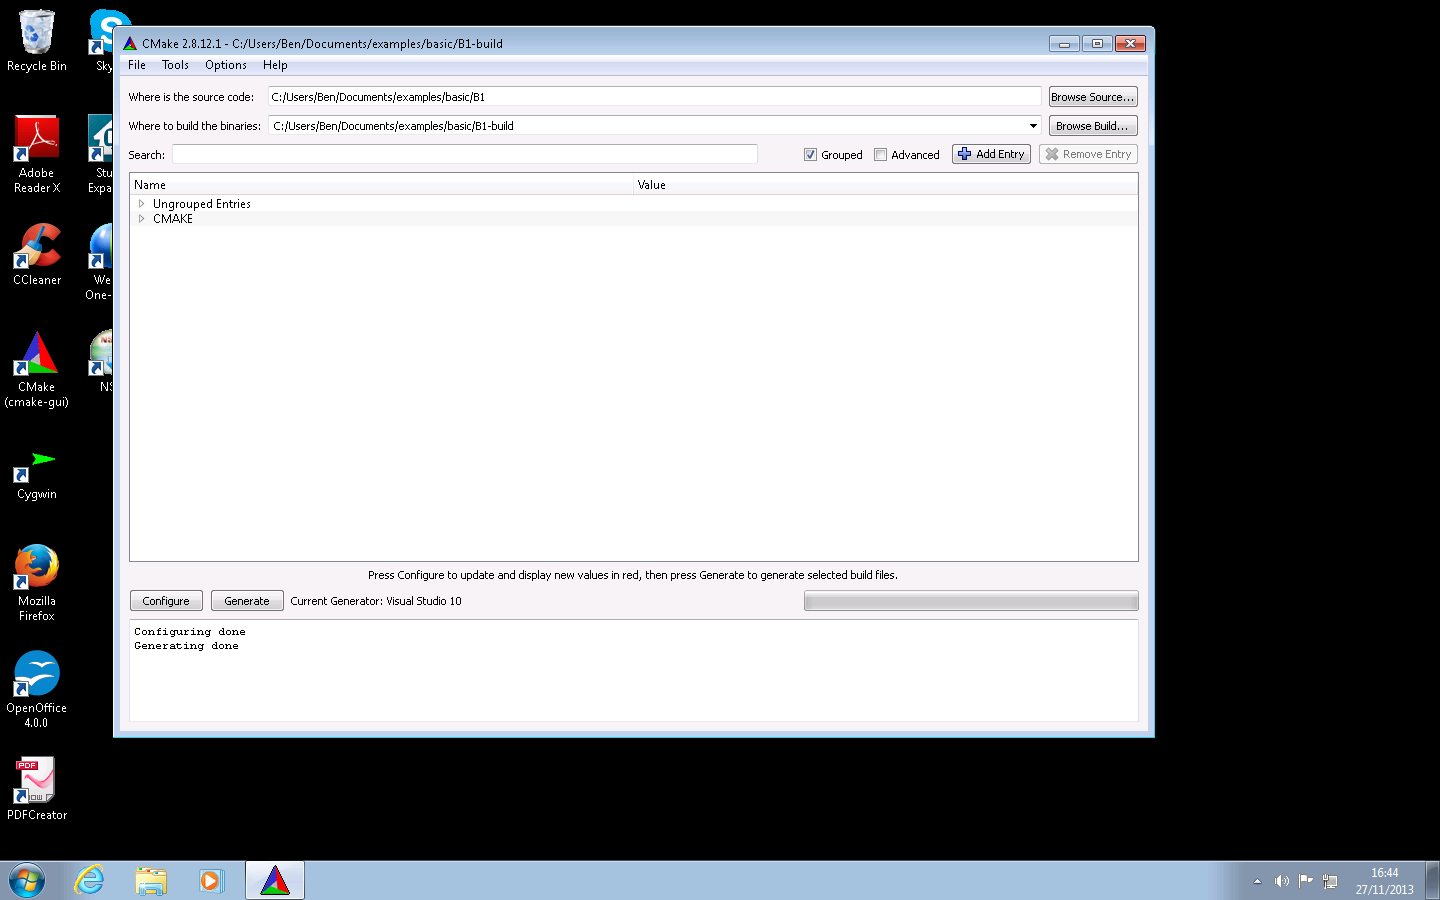
After a further successful configuration, you will see Configuring done in the logging window at the bottom, and there should be no red colored entries in the main window. Now click on the Generate button to create the Visual Studio solution.

After generation, you should see Configuring done, Generating done in the logging window at the bottom of the GUI. CMake has run successfully, and a Visual Studio solution has been created. You can now exit the CMake GUI.
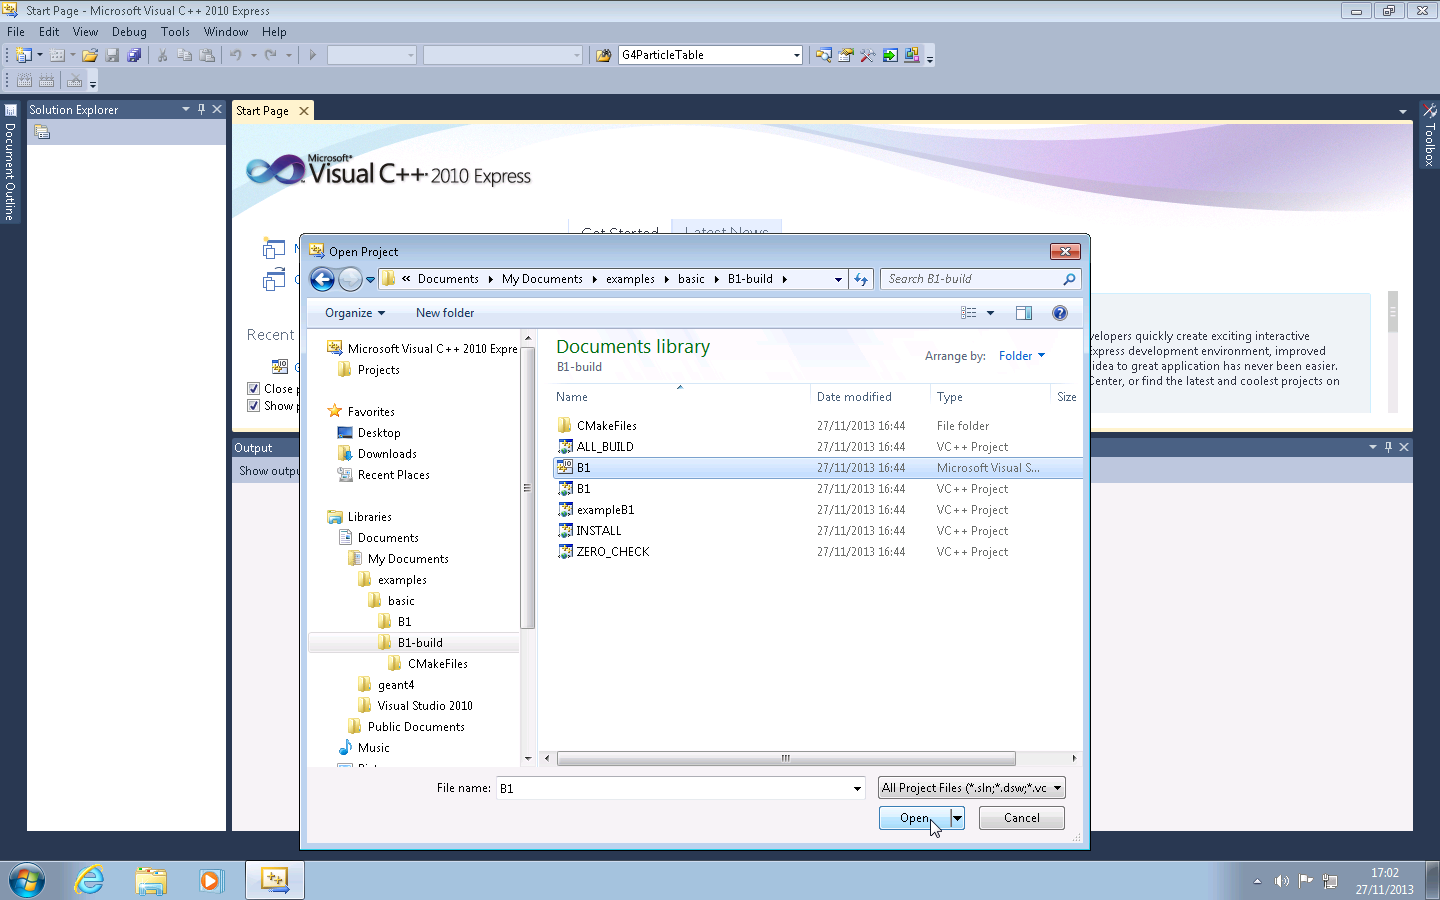
Now start up Visual Studio and choose Open Project. This guide is somewhat specific to Visual Studio 2010 Express, but the solution files should appear with the same names in both 2009 and 2013. Browse to your build directory and open the B1.sln Microsoft Visual Studio Solution file. It may take some time for Visual Studio to fully open the project and parse all the sources.
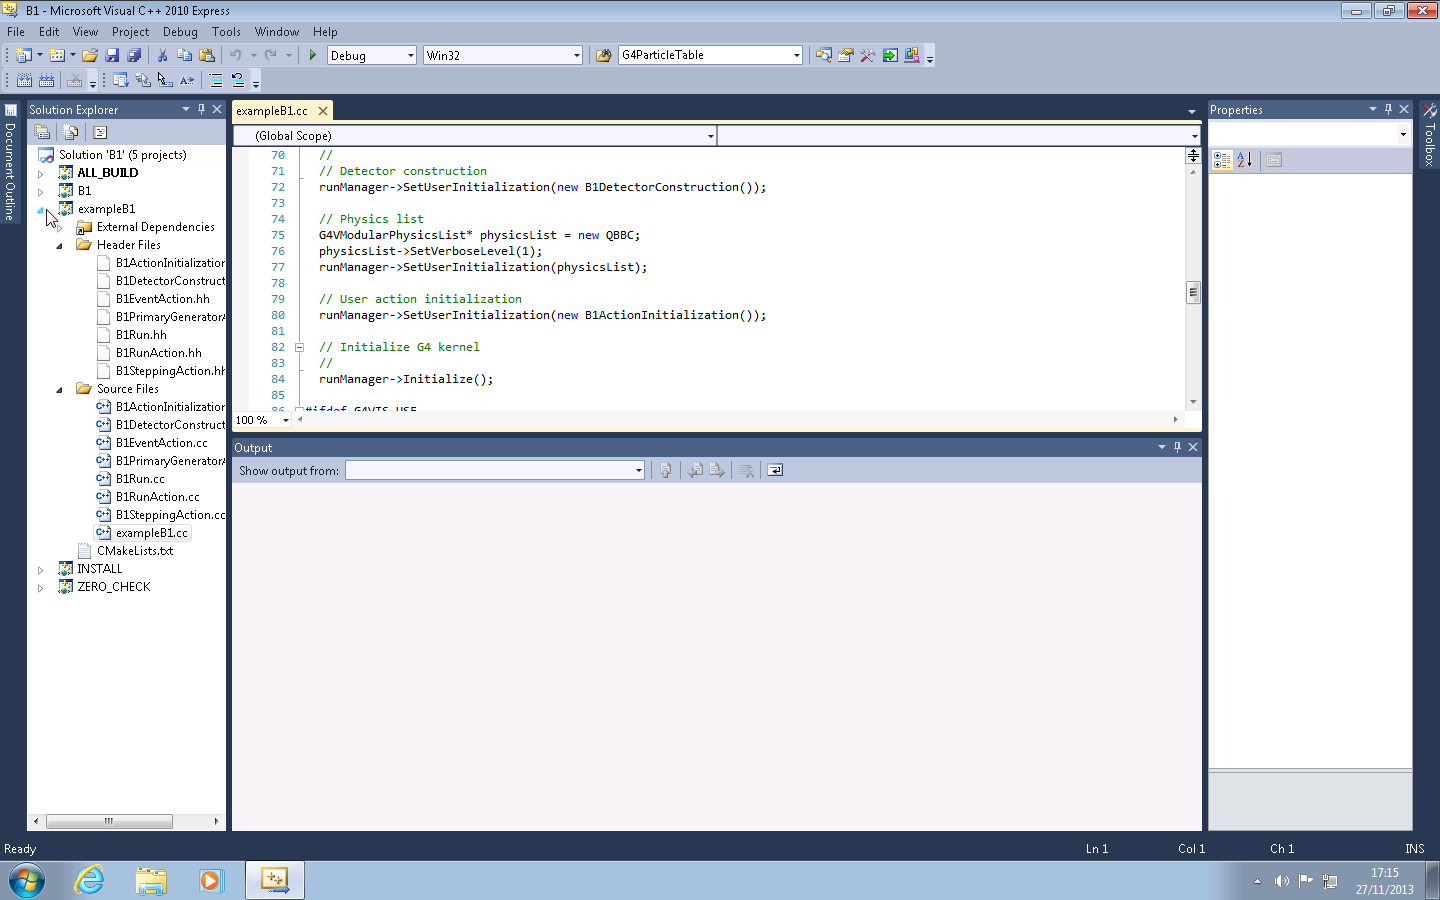
In the Solution Explorer, you can click on the exampleB1 to view the sources for the project.
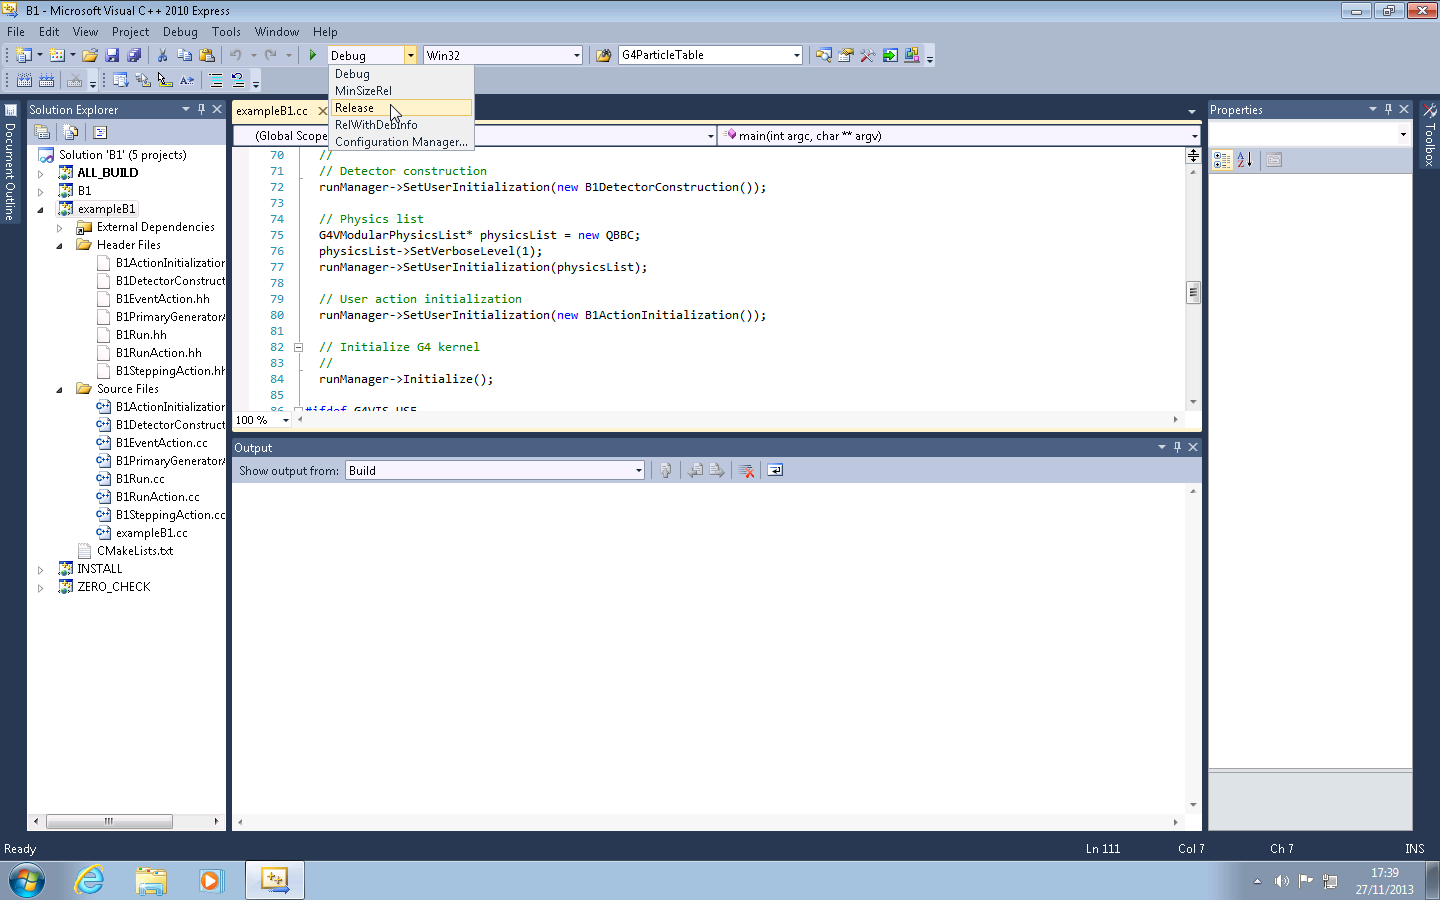
Click on the Solution Configuration drop down, and change the configuration to Release. In general, it's best to build your application with the same configuration as your Geant4 installation. In this example, we built Geant4 in Release mode, so we build the B1 example in the same mode.
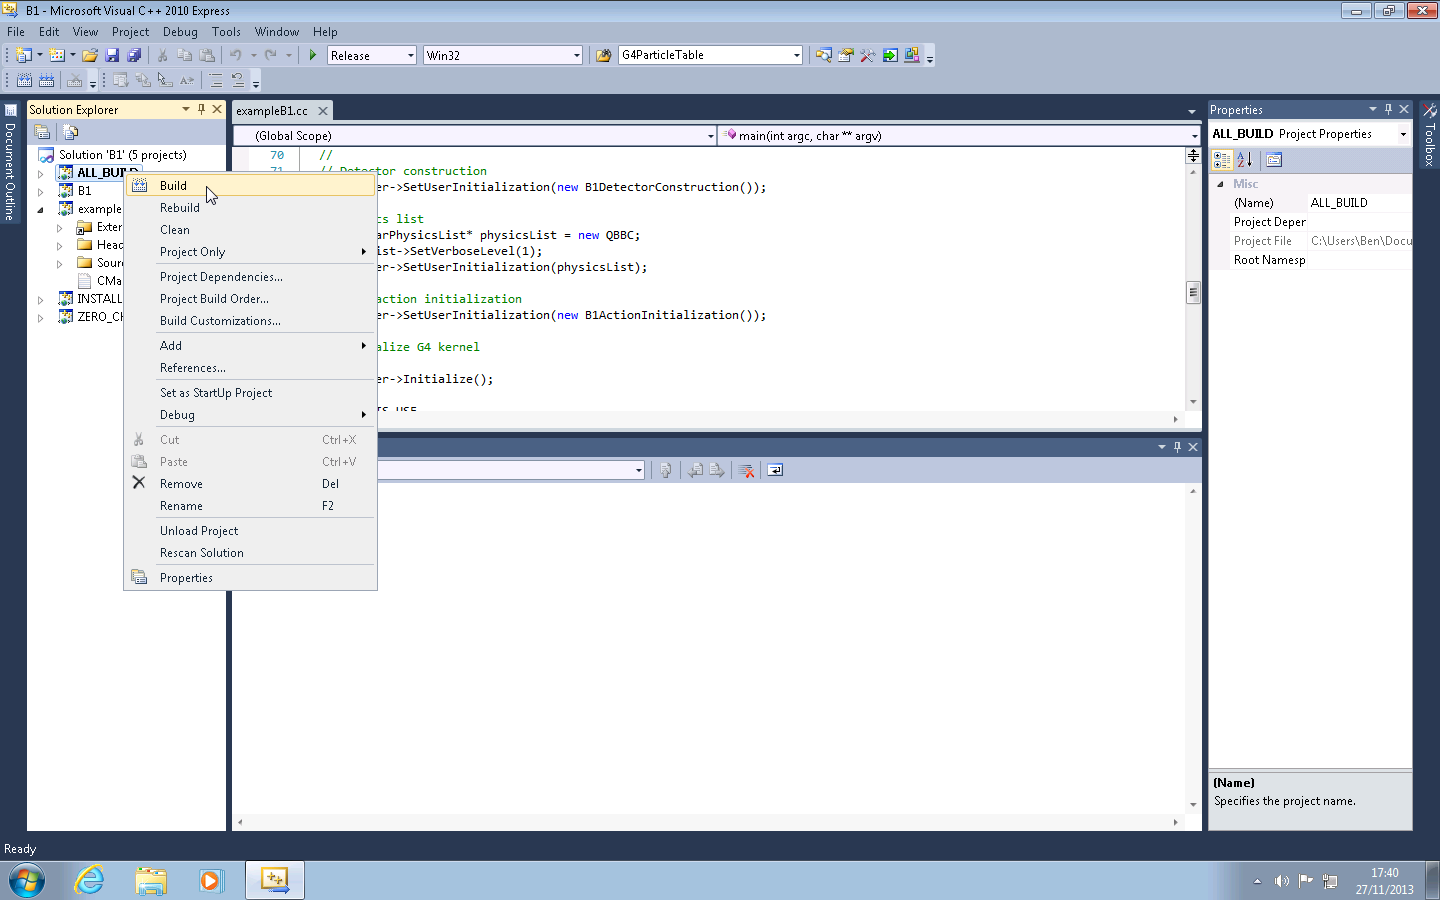
To build the project, right click on ALL_BUILD in the Solution Explorer and click Build in the dialog box.
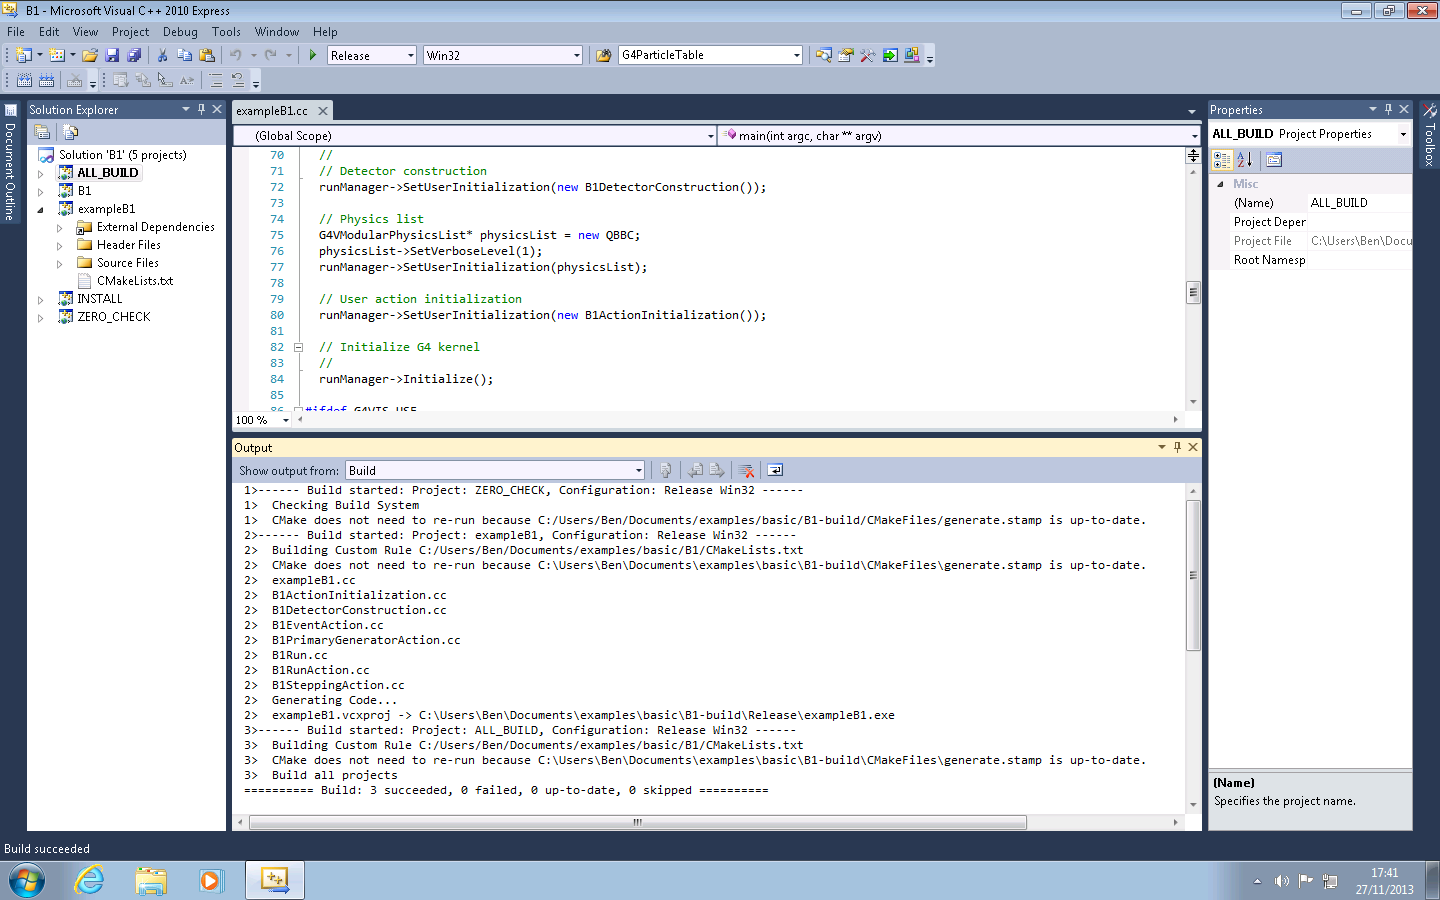
Visual Studio will perform the build, and report on progress in Output.
Whilst you can run the built application in Visual Studio, it can be tricky to set up all the paths correctly (see below). It's therefore easiest to open a cmd.exe window and cd to the build directory (the directory where the Visual Studio solution was generated). You can then run the built application directly from the command line. Note that because Visual Studio supports multiple configurations and we've built in Release mode, the application is located at Release\exampleB1.exe.
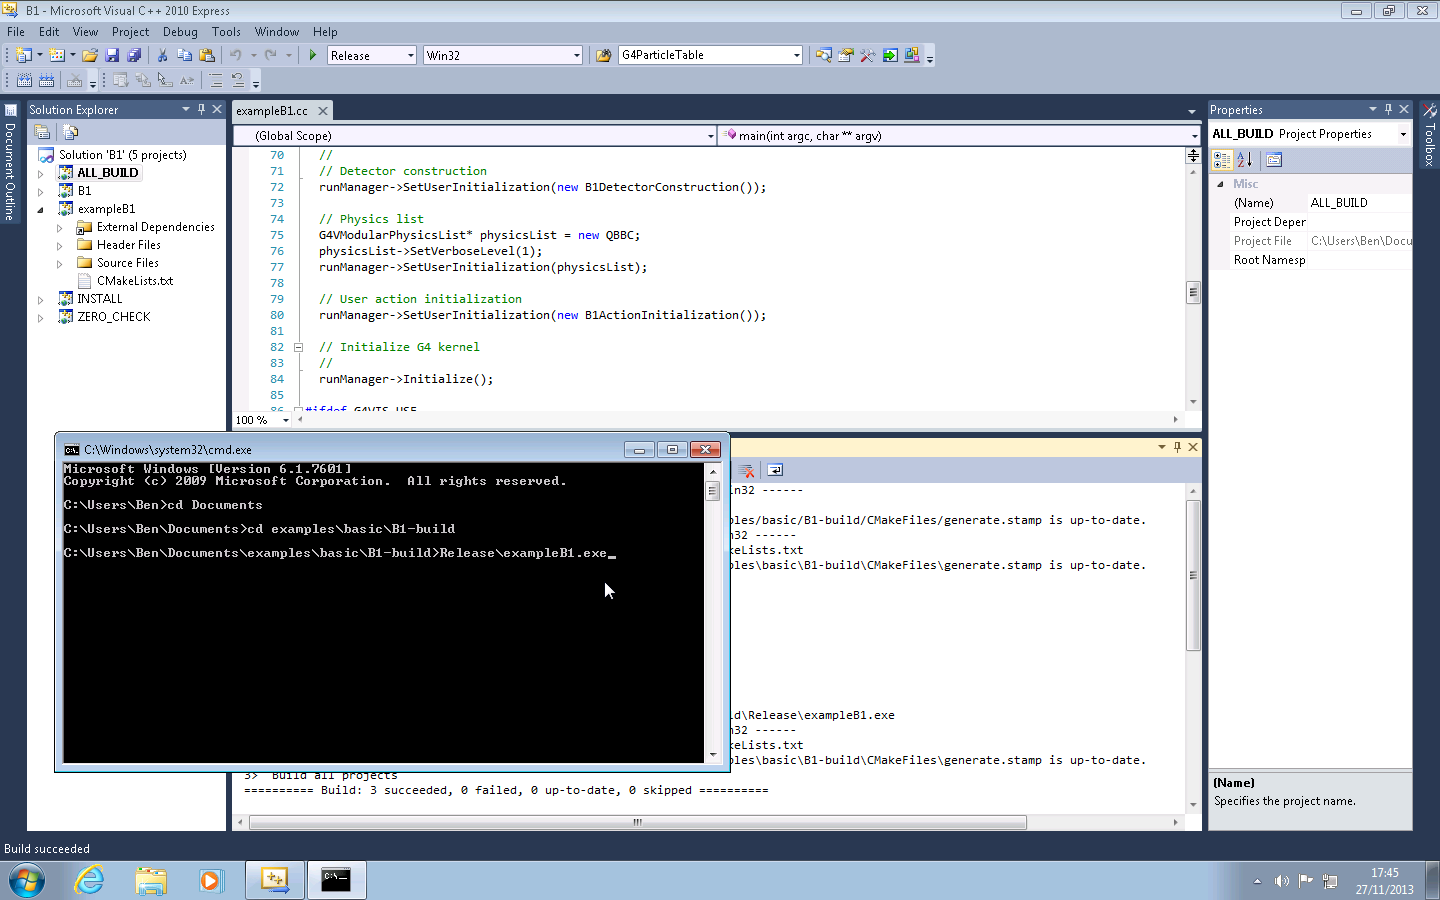
On execution, the exampleB1 application should pop up a UI window, and a visualization window if your install of Geant4 was installed with OpenGL visualization.
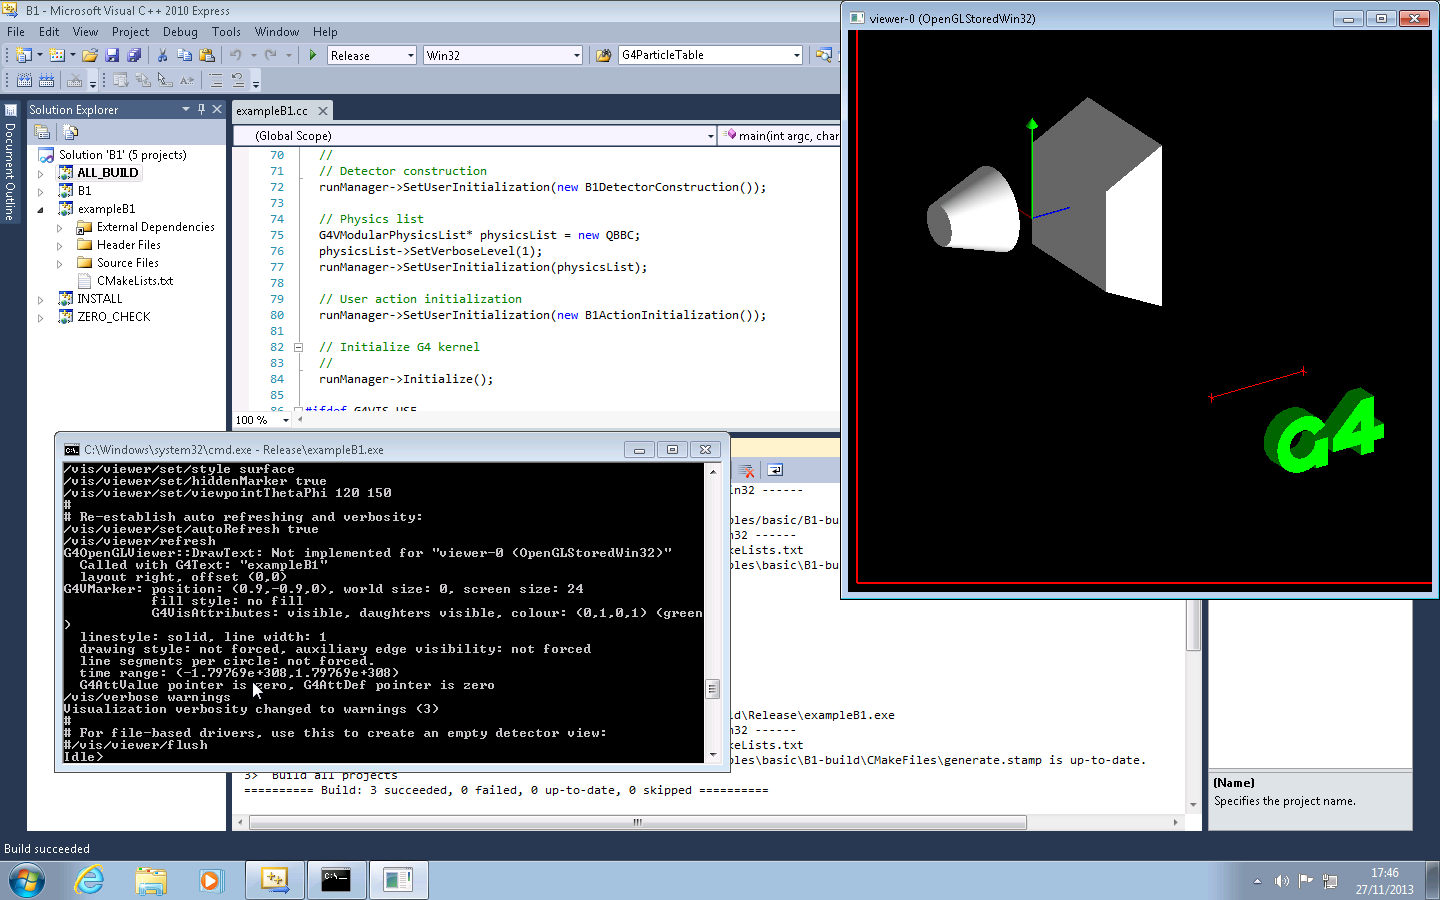
The exampleB1 can be controlled from the Geant4 CLI as normal, here we have run 10 events.

As noted above, you can also run the application through the Visual Studio debugger, although we have seen issues with setting the directory to run incorrectly. The executable locates the macro files by assuming they are in the current working directory, so the executable must be run from a directory containing the macros.
One key CMake related item to note goes back to our listing of
the headers for the application in
the call to add_executable. Whilst CMake
will naturally ignore these for configuring compilation
of the application, it will add them to the Visual Studio
Solution. If you do not list them, they will not be editable in
the Solution.
Geant4Make is the Geant4 GNU Make toolchain formerly used to build
the toolkit and applications. If you have written Geant4
Applications which used a GNUmakefile and a
"binmake.gmk" file, then Geant4Make is the
system used behind the scenes to build your application.
So whilst we now refer to
this old system as "Geant4Make" the concepts should be familiar.
This system, is still supplied so that your applications using
Geant4Make will continue to build using the new CMake build and
install of Geant4. However, due to incompatibilities between the
way Geant4Make expects Geant4 to be installed and the standard
install hierarchy now used, we do not support Geant4Make on
Windows platforms. We encourage users to migrate to CMake to
build their applications on Windows.
Please also note that Geant4Make is deprecated and is not
supported in Geant4 10.0 and later.
The Geant4Make GNUmake system is controlled by series of GNUmake modules which are installed under:
      +- CMAKE_INSTALL_PREFIX/ (where you installed Geant4)
         +- share/
            +- Geant4-10.1.0/
               +- geant4make/
                  +- geant4make.sh
                  +- geant4make.csh
                  +- config/
                     +- binmake.gmk
                     +- ...
The system is designed to form a self-contained GNUMake system which is configured primarily by environment variables (though you may manually replace these with variables in your GNUmakefile if you prefer). You may find more detailed documentation on this structure in Section 5. Building a Geant4 application using Geant4Make therefore involves configuring your environment followed by writing a GNUmakefile using the Geant4Make variables and GNUMake modules.
To configure your environment, simply source the relevant
configuration script
CMAKE_INSTALL_PREFIX/share/Geant4-10.1.0/geant4make/geant4make.(c)sh
for your shell. Here, you should replace
CMAKE_INSTALL_PREFIX
with the actual directory you installed Geant4 under.
Whilst both scripts can be sourced
interactively, if you are using the C shell and need to source the
script inside another script, you must use the commands:
      cd CMAKE_INSTALL_PREFIX/share/Geant4-10.1.0/geant4make
      source geant4make.csh
or alternatively
  source CMAKE_INSTALL_PREFIX/share/Geant4-10.1.0/geant4make/geant4make.csh \\
    CMAKE_INSTALL_PREFIX/share/Geant4-10.1.0/geant4make
In both cases, you should replace
CMAKE_INSTALL_PREFIX
with the actual directory you installed Geant4 under.
Both of these commands work around a limitation in the C shell
which prevents the script locating itself.
Please also note that due to limitations of Geant4Make, you
should not rely on the environment variables
it sets for paths into Geant4 itself. In particular, note that the
G4INSTALL variable is not equivalent
to CMAKE_INSTALL_PREFIX.
Once you have configured your environment, you can start building your application. Geant4Make enforces a specific organization and naming of your sources in order to simplify the build. Going back to our concrete application "ExampleB1", the sources are arranged just like before (so we have omitted some for clarity):
     +- B1/
         +- GNUmakefile
         +- exampleB1.cc
         +- include/
         |  ... headers.hh ...
         +- src/
            ... sources.cc ...
As before, exampleB1.cc contains
main() for the application, with
include/ and src/ containing
the implementation class headers and sources respectively.
You must organise your
sources in this structure with these filename extensions
to use Geant4Make as it will expect this structure when it
tries to build the application.
With this structure in place, the GNUmakefile for exampleB1 is very simple:
      name := exampleB1
      G4TARGET := $(name)
      G4EXLIB := true

      .PHONY: all
      all: lib bin

      include $(G4INSTALL)/config/binmake.gmk
Here, name is set to the application to be built,
and it must match the name of the file containing the
main() program without the .cc
extension. The rest of the variables are structural to prepare the
build, and finally the core Geant4Make module is included. The
G4INSTALL variable is set in the environment
by the geant4make shell scripts to point to
the root of the Geant4Make directory structure.
With this structure in place, simply run make
in the same directory as the GNUmakefile to build your application:
$ make
If you need extra detail on the build, you append
CPPVERBOSE=1 to the make command to see
a detailed log of the commands executed.
The application executable will be output to
$(G4WORKDIR)/bin/$(G4SYSTEM)/exampleB1, where
$(G4SYSTEM) is the system and compiler
combination you are running on, e.g. Linux-g++. By default,
$(G4WORKDIR) is set by the
geant4make scripts to
$(HOME)/geant4_workdir, and also prepends this
directory to your PATH. You can therefore
run the application directly once it's built:
$ exampleB1
If you prefer to keep your application builds separate, then you
can set G4WORKDIR in the
GNUmakefile before including
binmake.gmk. In this case you would have to run
the executable by supplying the full path.
Further documentation of the usage of Geant4Make and syntax and
extensions for the GNUMakefile is described in
Section 5
Please note that the Geant4Make toolchain is deprecated and
provided purely for convenience and backwards compatibility.
We encourage you to use
and migrate your applications to the CMake system or to use the
geant4-config program with the buildsystem of
your choice.
Geant4Make is no longer supported in Geant4 10.0 and
later.
| |  | |
| 2.7. Geant4 General Particle Source |  | 2.9. How to Set Up an Interactive Session |